Create your own price list with magicplan. Streamline your workflow by creating modules.
You can download a pre-filled sample price list here:
Example Price List "Remodeling" - IMPERIAL (USD)
Example Price List "Remodeling" - METRIC (EUR)
This is the demo price list that free magicplan users can see preinstalled in the app.
The following instructions show you how to import data in bulk into your price list. If you only want to add or change individual elements, we recommend our Price List Manager in the magicplan Cloud. It offers a contextual interface and allows you to make changes to your Price List with just a few clicks.
Creating a Price List
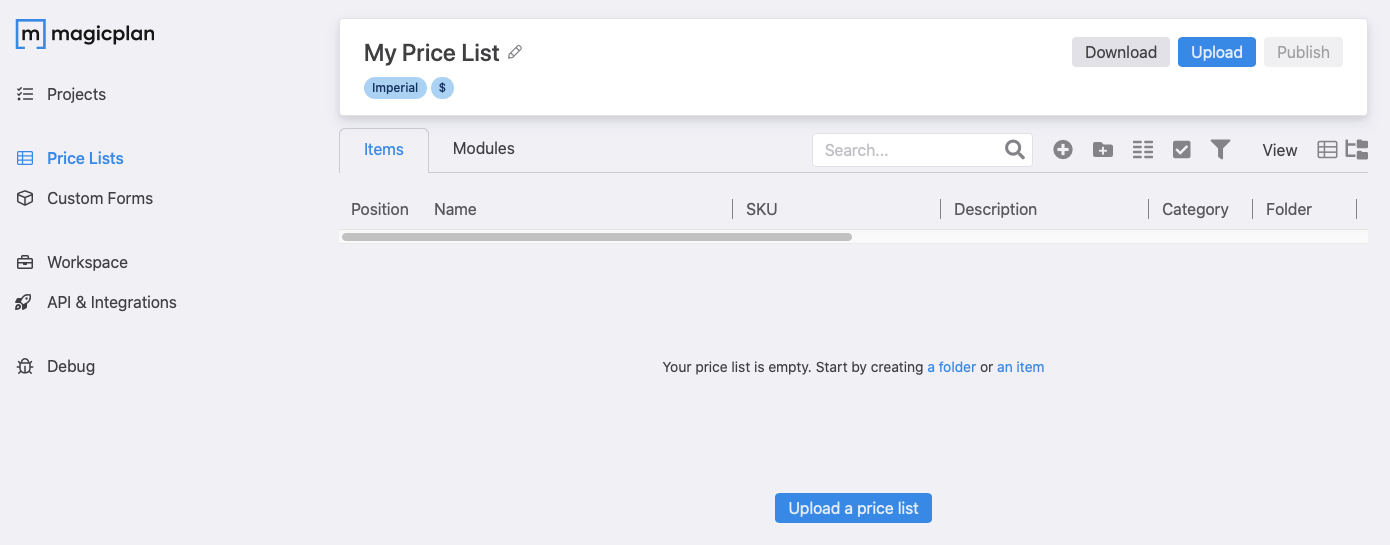
How to access the Price List Manager
- Log in to the magicplan Cloud. On your left, you will find the menu. Here, you can select "Price Lists" and an overview of your existing Price Lists is displayed.
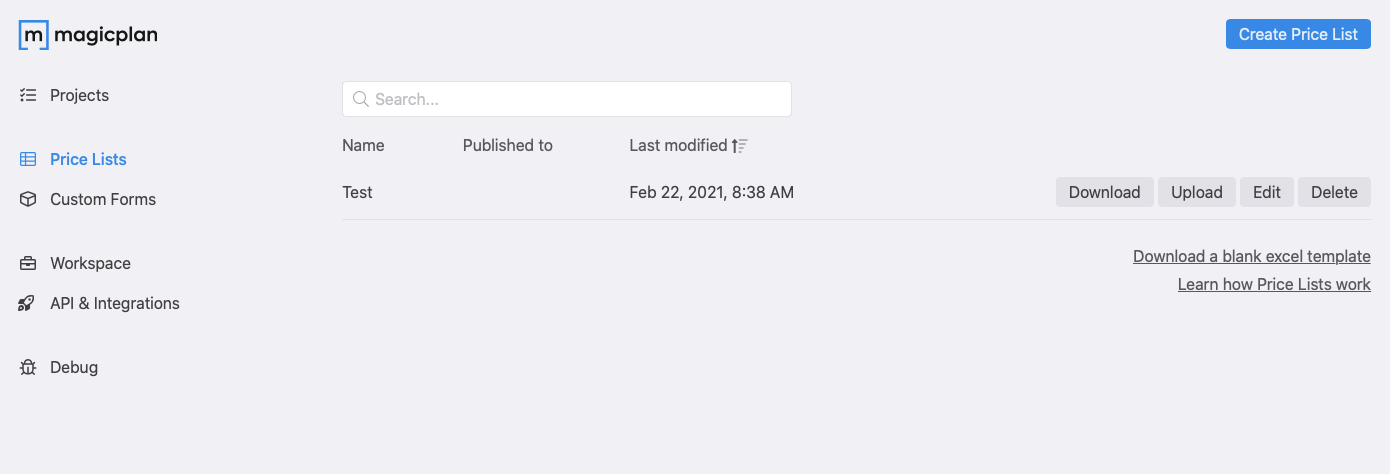
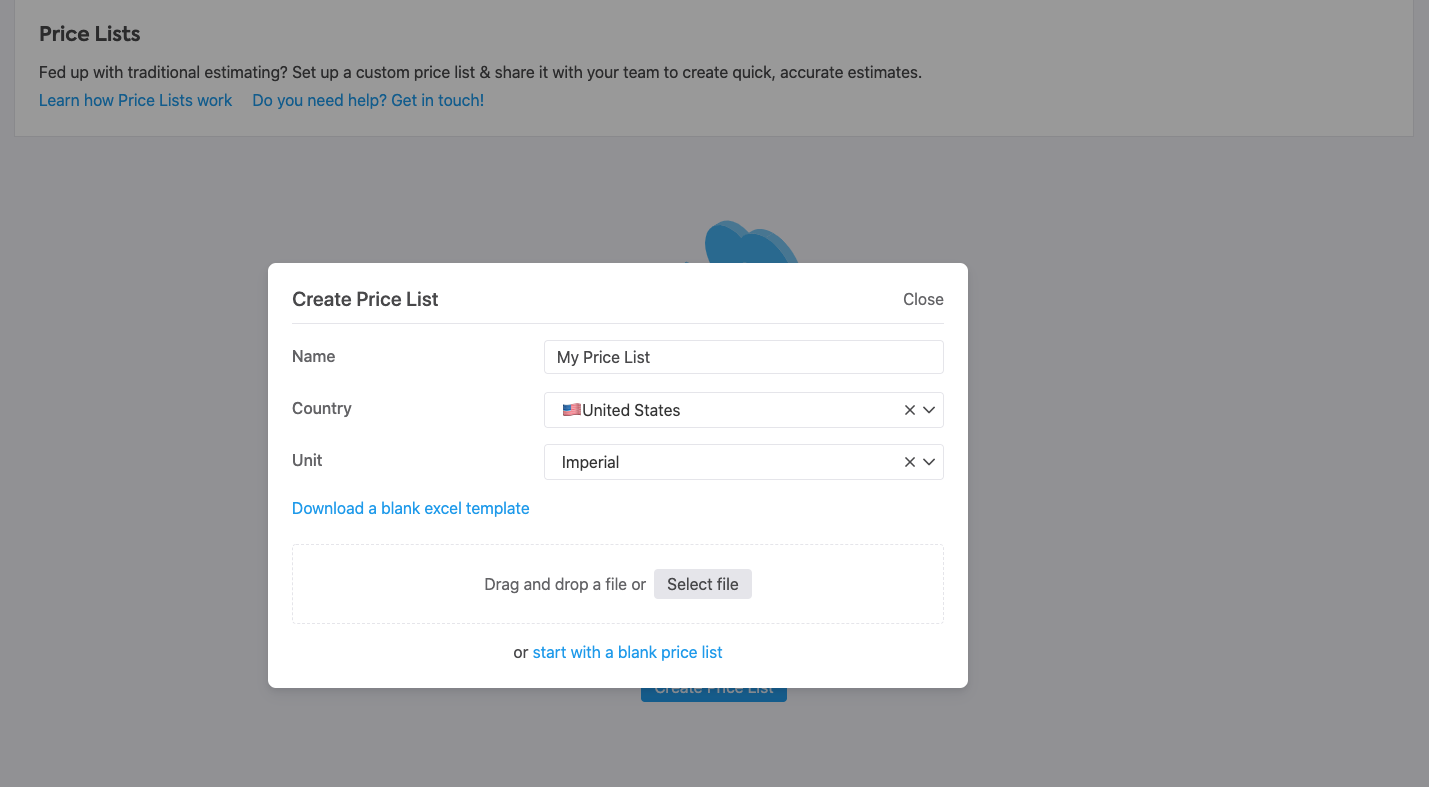
- Click on "Create Price List". A pop-up window will appear, where you can name your Price List. You can also select your country and your preferred units for the Price List (Imperial or Metric). This is important because you cannot change the units later. After entering the basic information, you can create an empty one by selecting "start with a blank price list".
- Click on "Download" at the top right and load the empty price list as an Excel file onto your computer.

- Open the Excel file on your computer.
Fill in the Price List with Items
- When you open the Excel file, you will see the sheet titled "Items".
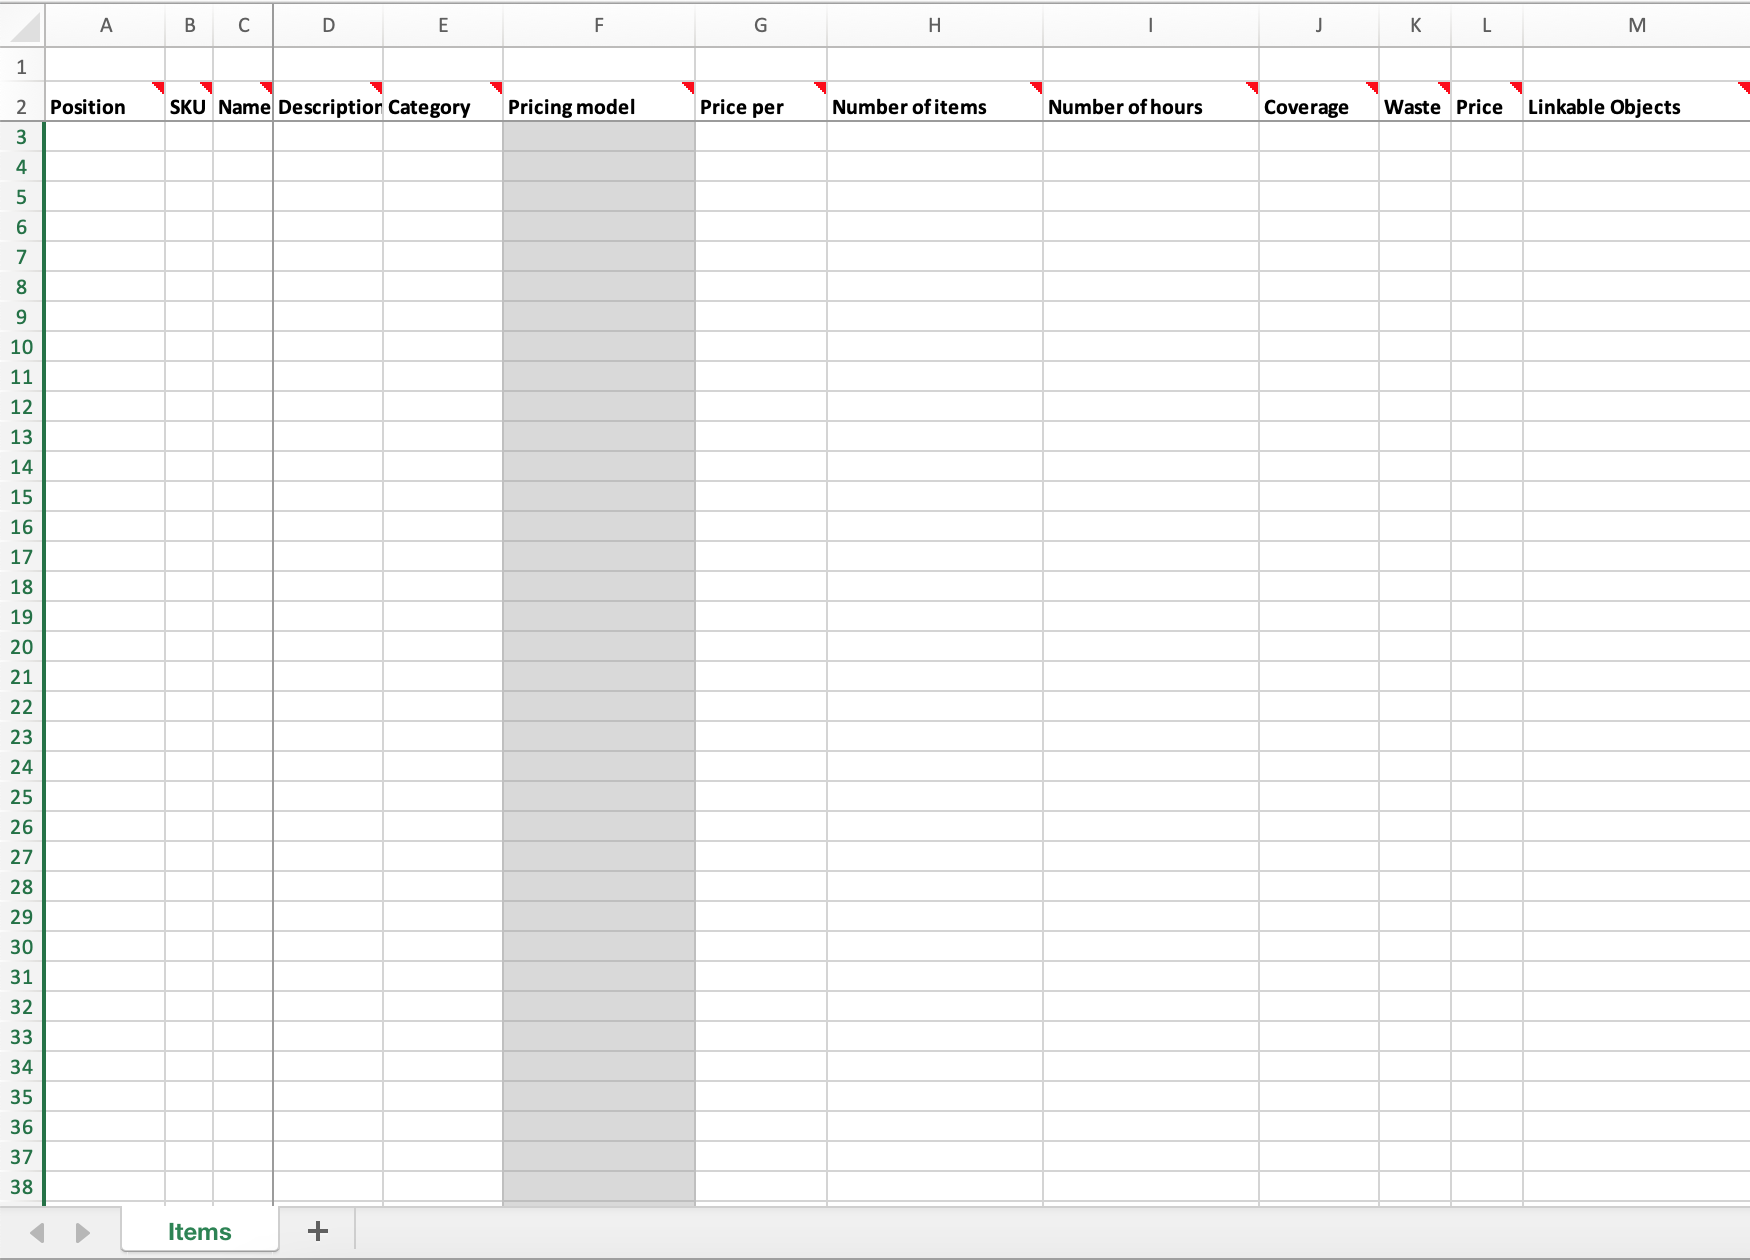
- In the first three columns, you can enter the Position, Item Number (SKU), and the Name of your item. The 'Position' field is not mandatory and can be used if you want an individual order of your items in your Price List. Otherwise, magicplan sorts the items according to the SKU specified by you, which is a mandatory field. An example of an SKU can be 01.02.0001. The first two digits "01" can be a placeholder for the category/folder to which the item belongs. The following two digits "02" can be used to further distinguish the items in a sub-category/folder. The last four digits "0001" can be a specific identifier for the items. Make sure each SKU is unique and not repeated in the Price List.
- In the "Name" field, enter the name of your item. Then, you can enter a "Description", if required. This ensures better clarity for your PDF exports.
- You can then assign an item to 10 predefined categories from the dropdown menu, or create a new one simply by typing a new category name in the field.
Now to the pricing of your created items - magicplan offers you many options for assigning prices to your items - depending on the application.
Pricing model: "Surface”
- Let's take a look at an example: If you have an item called "Interior Colour White", you can set the "Pricing Model" to "Surface". magicplan then calculates the number of boxes, cans, tubes, plates or tiles required depending on the range of the individual boxes, cans, tubes, plates or tiles. In this example, we set the value "Can" in the "Price per" column for the "Interior Colour White" item. Now, in the "Coverage" column, we have to set how much area we can cover with a can of this white paint. We also need to enter the price for a can in the "Price" column. For this item, we chose 80m² for the coverage and €50 for the price of a can. Optionally, we can also set a percentage of waste for the white paint. For demonstration purposes, let's put 10 in the waste column, which equals 10% scrap. The "Waste" column is only relevant if you have previously selected the "Price model", "Surface" or "Length".
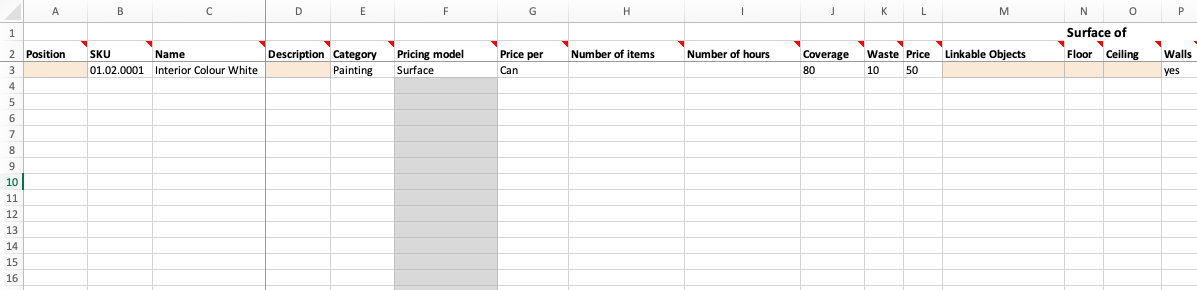
- In the end, we determine the area that should be used to calculate the final price for the "Interior colour white" item. For this, we use the columns under the section "Surface of:", "Floor", "Ceiling", "Walls". For the surfaces that you want to include in the calculation, simply enter "yes" in the appropriate columns. In our example, only the walls are to be painted and so we enter "yes" in the "Walls" column. Please note that only fields filled with "yes" will be considered.
Pricing model: "Item”
- The second pricing model available is Price per Item. For an item such as a "Washbasin", you can set the "Pricing model" to "Item". In contrast to the "Surface" pricing model, you only have to fill in the "Number of Items" and "Price" columns.

- In this example, we set the "Number of Items" to "1" and the "Price" to "80". In addition, you can select the appropriate magicplan 2D object in the "Linkable objects" column. This is optional.
Pricing Model: "Length"
- An example item for the "Length" pricing model is "Skirting Board for Parquet Floors". In this case, we set the "Price per" attribute to "m" because we want to assign a price to the parquet skirting board based on the length used.
- Now you need to enter the Coverage and Price. In this case, we enter "1" because the price is usually given in €/m. For the Price attribute, we set it to €1.80.
- Finally, you have to set which length you want to use for calculating the length. This is similar to the "Surface" pricing model. In the "Length of" you have a selection of lengths to choose from. For "Skirting Board for Parquet Floors", we select the "Room perimeter".
Pricing model: "Hour”
- The "Hour" pricing model is very versatile as you can use it for tool rentals or hourly wages. Amongst other things, you can set the pricing model to "Hour" for renting a "Drilling machine". Most tools are not rented by the hour, but by the day. So you can enter "24" in the "Number of hours" column. Then divide the rental price, which is €19.20, by 24 (hours) and enter the calculated value in the "Price" column.

Uploading the Price List to the magicplan Cloud
Once you have completed all the steps above, the Price List is ready to be uploaded to the magicplan Cloud. In the Cloud, click on "Price Lists" on your left. Then click the "Upload" button within the Price List you created at the beginning.
A pop-up window will appear where you can select or drag and drop the file you want to upload.

You can now see all your imported items.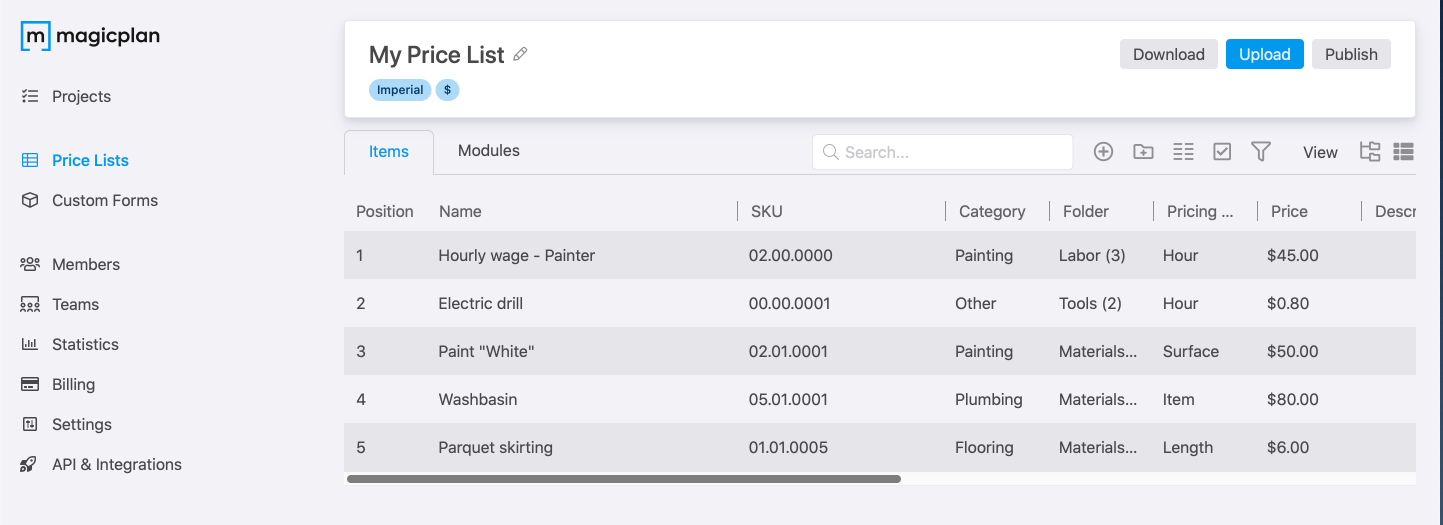
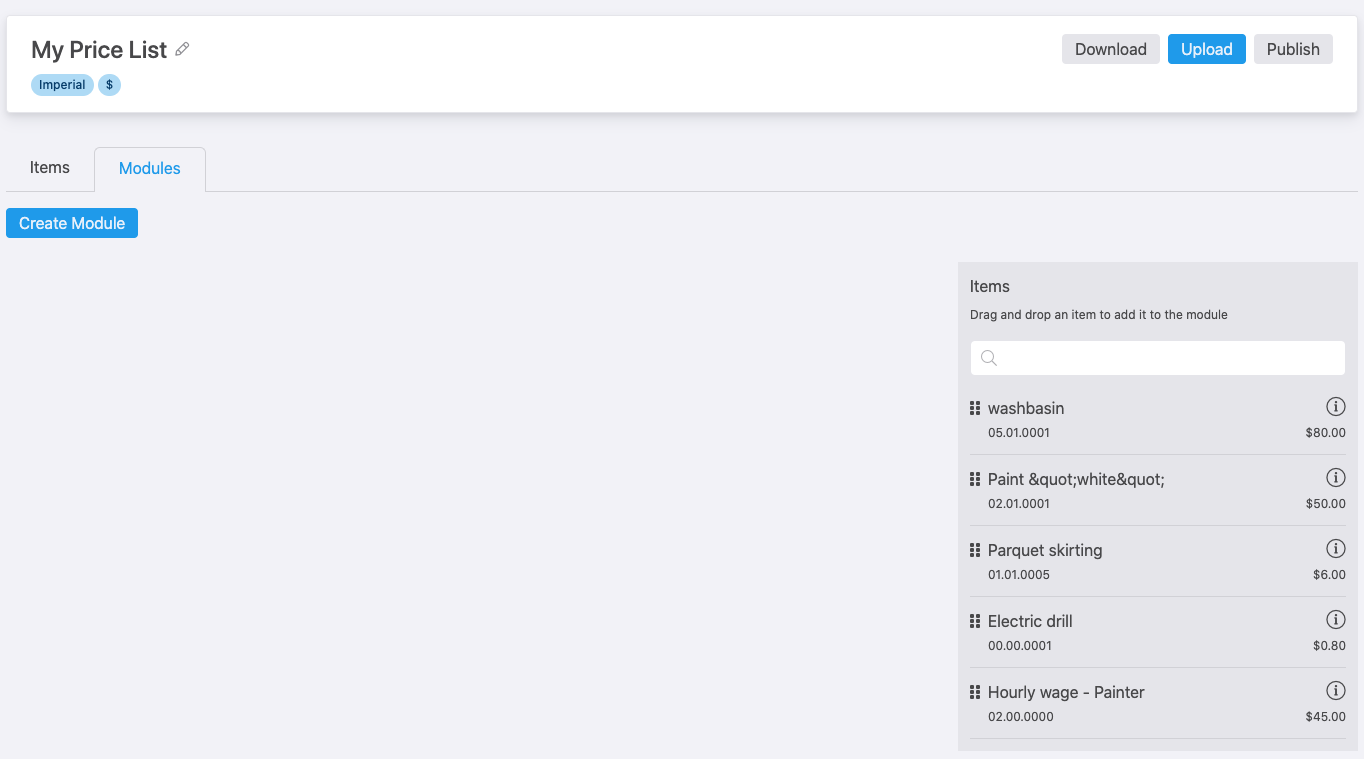
Creating Modules
- Modules are a great way to group specific elements that you always use together in a workflow. The creation of Price Lists with magicplan is significantly accelerated through the use of modules. After you have successfully uploaded your Price List, click on "Modules" and a blue "Create module" button will appear. When you click on it, a pop-up window will appear.
- Fill in the Name, Description, SKU, Folder, and Category.
- The SKU should be unique to differentiate the modules. It behaves exactly like the item SKU number, but only for modules.
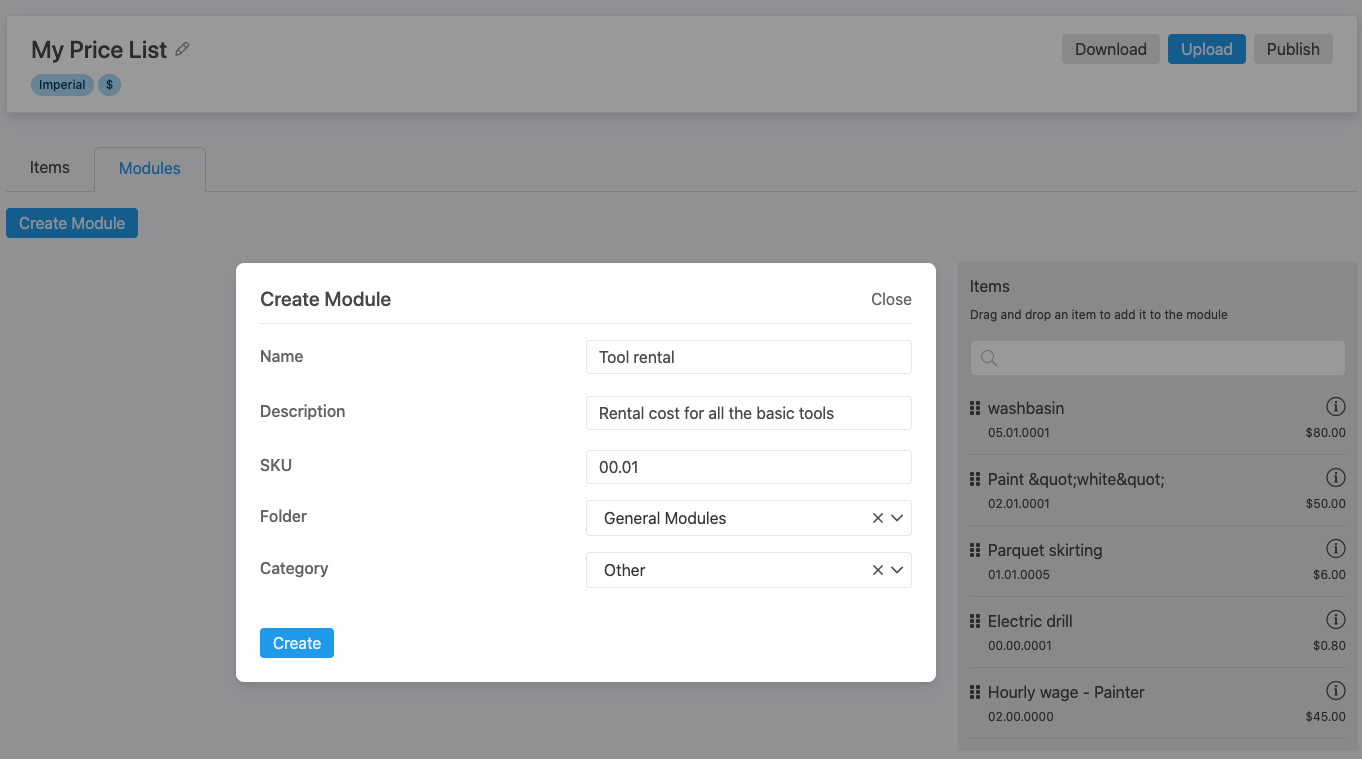
- By assigning modules to folders, you can specify where the module will be visible in the app.
- In the Category section you can assign the module to a specific folder available in the drop-down menu.
- After filling out the sections, click "Create" to create the module.
- The newly created module will now appear on the screen.
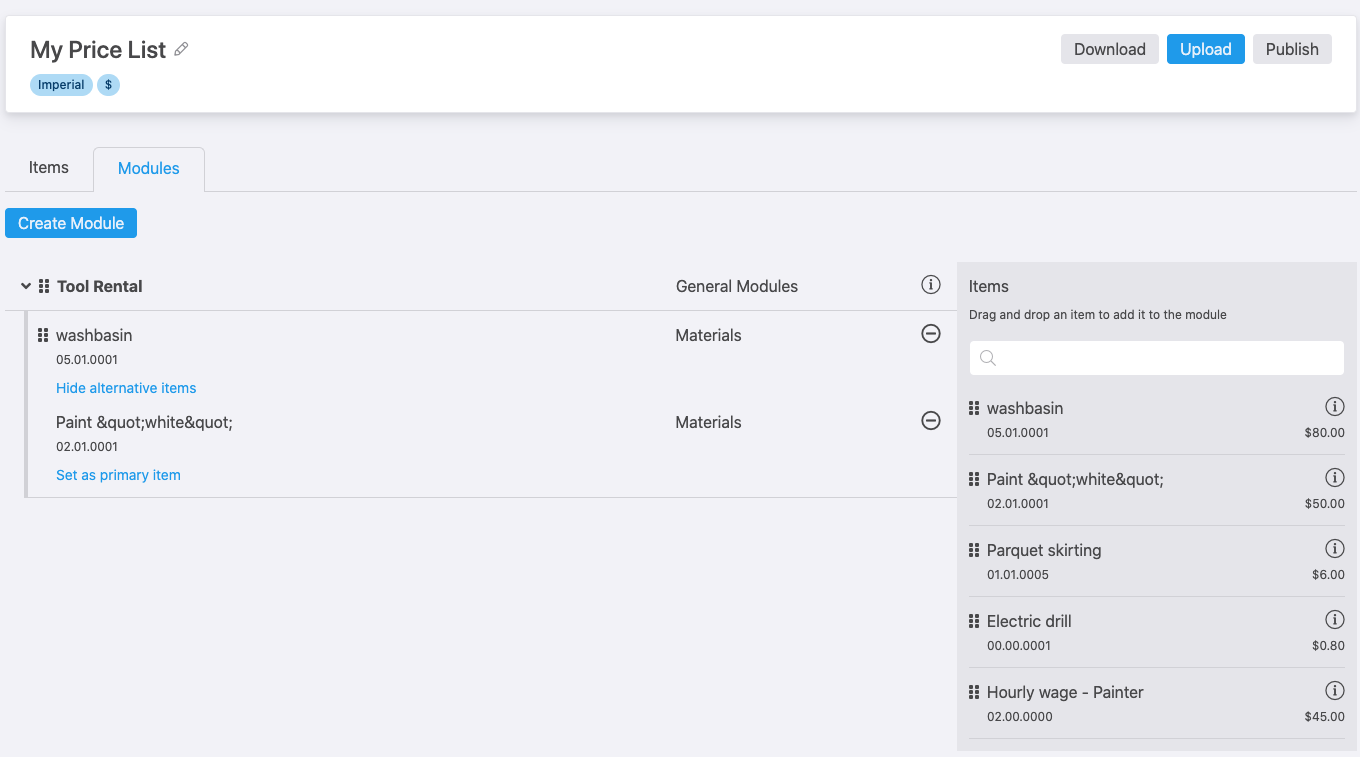
- To add items to your module, simply drag and drop the items you want from the right side into the module. You can also rearrange the elements within the module for your workflow.
- If you want to insert a certain item as an alternative in the module, for example, a different colour, simply drag and drop the item into the module you want to associate it with until "Add alternative item" appears. Now you can let go and the item will be accepted as an alternative item.
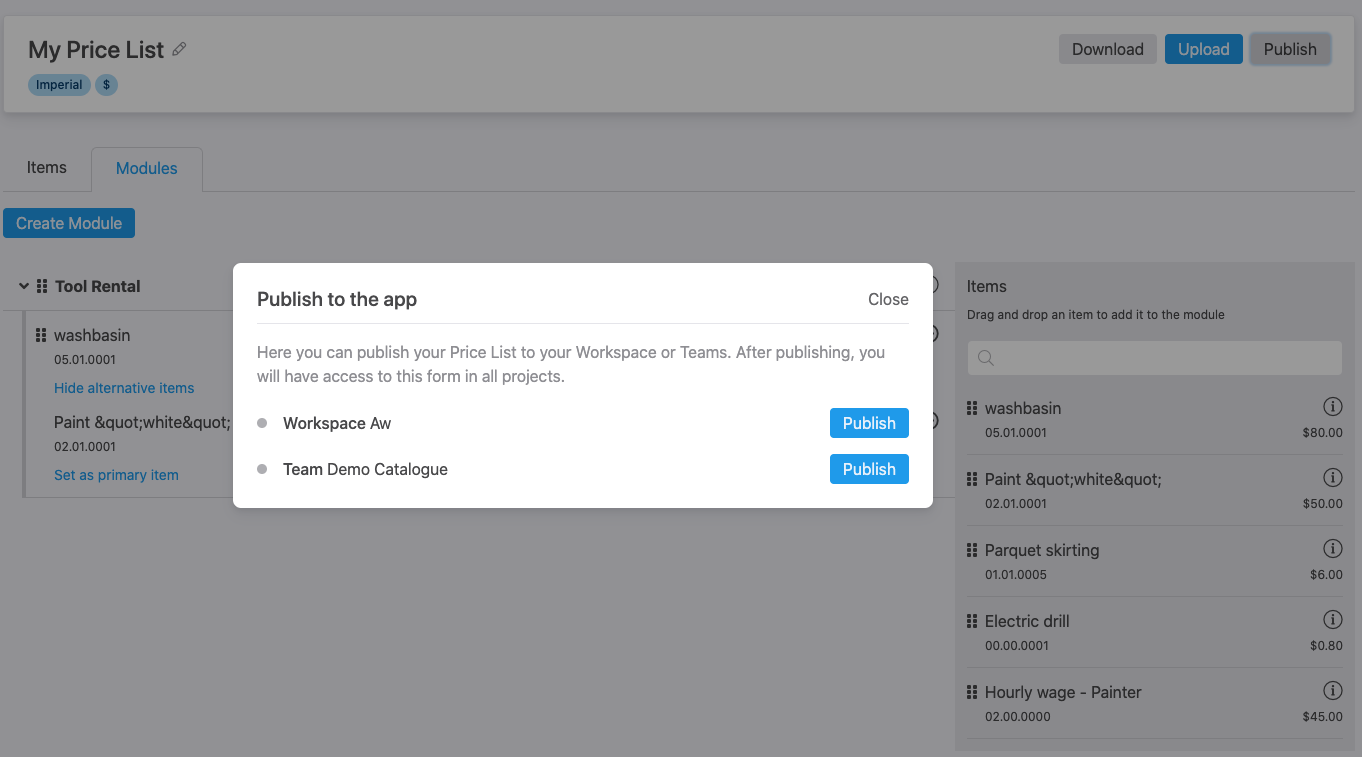
Publishing your Price List in magicplan
- When you're happy with your price list, you can quickly publish it to the magicplan app to start creating quotes.
- Click on "Price Lists" in the magicplan Cloud.
- Select the Price List you want to upload and click "Edit". The "Publish" button will appear at the top right.
- Once you click "Publish" a pop-up window will appear and you can select the workspace/team you want to publish to.
- The price list will automatically be applied to the app on your device. If you do not see it, refresh the app by dragging down on the home screen.
- iOS: If using app version 2023.4.0 or older, you will need to update your workspace configuration. You should see a red dot on "My Account" on the bottom bar. Tap "My Account", then "Update Workspace Configuration".
Update your Price List
- Click on "Price Lists" in the magicplan Cloud.
- Select an existing Price List that you want to update and click on "Edit".
- To edit the Price List you will need to download the Excel file by clicking on the "Download" button at the top-right.
- Open the Excel file on your computer and edit your items.
- After you have finished editing your Price List, save the Excel file and re-upload it to the cloud by selecting "Upload".
- Existing modules are automatically updated even if you have made changes to items that were contained in them. You can edit your modules at any time.
- In order to make the new version of your price list available in the app, you will have to republish it. Once you click "Publish" a pop-up window will appear where you can select the workspace/team you want to publish to.
Column Explanation
Position
Optional: Enter numbers to define the order of your items. Use increments of 10 to easily integrate new articles.
SKU
Enter a unique identifier for the item.
Name
Enter the name of your item.
Description
Optional: Enter a detailed description of the item. The description will appear in the export.
Category
Optional: Items are tagged with the category.
Pricing model
Define how the price should be calculated: per item, per surface, per length, per volume or per hour.
Price per
Depending on the size of the individual cases, cans, tubes, sheets or tiles, magicplan calculates the number of cases, cans, tubes, sheets or tiles required.
Number of items
Is only required for "Pricing model = Item".
Number of hours
Is only required for "Pricing model = Hour".
Coverage
Is only required for "Price per = case, can, tube, sheet or tile". Define the number of cases, cans, tubes, sheets or tiles that fit in the surface or length.
Waste
Optional: only relevant for "Pricing model = surface or length". Define the percentage of scrap for the material (e.g. tiles).
Price
Define the price for this item as a number. For example, in the case of electrical switches sold in boxes of 10 at $50, "Price" should be "5", "Pricing Model" should be "Item" and "Number of Items" should be 10.
Linkable objects
Optional: The article is applied and connected to this object type in the project. For example, the item "paint door" can be applied to "Doors".
Surface of floor
Only relevant for "Pricing model = Surface". Specify whether the element should be applied to the floor surface.
Ceiling
Only relevant for "Pricing model = Surface". Choose whether to apply the post to the ceiling. choose e.g. B. for paint, decide whether you only paint the walls or also the ceiling.
Walls
Only relevant for "Pricing model = Surface".
Room perimeter
Only relevant for "Pricing Model = Length". Specify what perimeter to use for calculating the length. You can choose either "room perimeter", "perimeter of doors/windows" or "width of doors/windows".
Perimeter of doors/windows
Only relevant for "Pricing Model = Length". Specify what perimeter to use for calculating the length. You can choose either "room perimeter", "perimeter of doors/windows" or "width of doors/windows".
Width of doors/windows
Only relevant for "Pricing Model = Length". Specify what perimeter to use for calculating the length. You can choose either "room perimeter", "perimeter of doors/windows" or "width of doors/windows".
Percentage
Percentage of taxes, surcharges, or rebates. Enter “10” to get a 10% surcharge, or “-10” to get a 10% rebate.
If you're having trouble uploading your price list to the cloud, or if you're getting error messages after uploading, take a look at this article: Error messages after uploading a Price List.