We’re excited to announce an update to magicplan that will revolutionize how you manage your projects! These enhancements make it easier to capture and organize site details with speed, precision and clarity. Plus, with a revamped user interface, navigating the app is now smoother and more intuitive, helping you find exactly what you need faster. By staying informed about these important updates, you can continue to make the most of magicplan’s powerful tools and features. Let's dive in to see what’s changing and how it might impact you.
ℹ️ Note: These updates apply to app version 2024.24.0 and subsequent releases. If you haven't seen the updates yet, it could be because the rollout is still underway and your device has not yet received the new features.
New Features
Visual Documentation & Photo Tools
We’re improving job site documentation with brand new photo tools and updated features:
- Dedicated photo section: Have full visibility of photos captured on-site in the new project section. Photos are always up to date, automatically time-stamped, and saved by location, making it easy to track progress.
- Unlimited Cloud Storage: Store all your job site photos in the cloud without worrying about storage limits.
- Instant Sync Across Devices: Photos captured in the field are automatically synced across mobile and web platforms, allowing for real-time progress updates.
- Create & Share Photo Reports: Share unlimited photos with customers and stakeholders, or create & share branded project galleries and interactive Photo Report PDFs with selected images. Share large quantities of photos without worrying about load times or attachment sizes.
Photo App features
New capabilities allow you to customize the photos you add to your projects as you take them.
- Automatic Time-Stamping and Location Tagging: Each photo is time-stamped and tagged with the specific room location within the property.
- Flashlight Mode: Activate the flashlight mode in the app when capturing photos in a dark room.
- Photo Descriptions: Add photo descriptions to provide important context about your project.
- Photo Markup: Easily draw, add arrows, or insert text to highlight key details in photos.
- Image Editing Tools: Adjust brightness, crop images, and more to enhance photo quality.
- Redaction Tool: Pixelate sensitive information with the new redaction tool.
- 360 Camera Support: magicplan now supports all Ricoh 360 cameras for capturing comprehensive job site views. 360 photos are included in your project photo gallery.
📷 Learn more about our new visual and photo tools here.
ℹ️ Note: FLIR cameras and capture thermal images are not currently compatible with the new magicplan. You can still capture thermal images with the FLIR app and import the photos to magicplan.
Digital Documents
magicplan’s file section has been updated to digitally manage every form, contract and document associated with a project in one place.
- Digitize All Paperwork: Upload or scan printed documents with your device, converting every form, contract, and document into a digital format (PDF) with unlimited cloud storage.
- Edit & Annotate PDFs: Move, delete and change information in any PDF you generate in magicplan or upload, including pages that you don't want included. Add annotations such as text, arrows and other shapes to provide more detail.
- On-Site Completion: Complete forms and capture signatures on-site, reducing the need for follow-up.
- Remote Access and Sync: As with photos, all documents are available anytime, anywhere, with instant syncing across devices.
- Organized and Time-Stamped: Documents are automatically organized by project and time-stamped for easy tracking.
Estimating
magicplan is launching an enhanced online Estimating tool that enables you to generate detailed estimates directly from your tablet using the app or from your desktop through the cloud. 📑 You can learn more about the functionality of our Estimator tool in this article.
User Interface Updates
My Projects: An Updated Home Screen
While the home screen retains a familiar look, there are a few notable changes:
- Seamless Cloud Syncing: With the new update, projects are automatically synced with the cloud, eliminating the need for manual uploads. You can no longer filter projects by “Device” or “Device & Cloud”, and projects won’t be marked with a cloud icon. This continuous syncing ensures data is available when you need it and makes for a more intuitive experience.
- Optimized Data Handling: Rather than downloading an entire project and all associated data, the app now only downloads necessary data, resulting in faster performance and improved usability.
- Offline Access with Favorites: A cloud icon will display on a project if you are offline, indicating that you can’t open the project because the minimum data required to open it hasn’t been downloaded. Use the "Favorites" feature to organize projects and ensure offline availability.
- Archive Older Projects: The option to “Delete” project has been replaced with an "Archive" button, allowing users to archive projects instead of deleting them.
New Project Dashboard
The redesigned project dashboard prominently displays all project elements such as floor plans, photos, estimates, and files, giving you quicker access to several features. The new project dashboard serves as a navigation hub to access all project-related content.
 |
 |
| Previous Project Dashboard | New Project Dashboard |
- Project Details: This section is now displayed in a full screen view. This page includes a Project Description field that replaces the project-level Notes. This description will be displayed in Reports just as the Notes were in the previous app version.
- You can access project details by tapping on the project name, the project description, or the “i” icon.
 |
 |
| Previous Project Details Access | Previous Project Details Section |
 |
 |
| New Project Details Access | New Project Details Section |
- Photos & Notes: There is no longer a Photos & Notes tab in the Project Details. Instead, access photos from the dedicated photo section on the project dashboard. Photos attached to the project level are still displayed in Reports.
 |
 |
| Previous Photos & Notes Section Access | Previous Photos & Notes Section |
 |
 |
| New Photo Section Access | New Dedicated Photo Section |
- Forms: There is no longer a Forms tab in the Project Details. They can now be accessed from the Forms section on the side menu of the project dashboard. Forms will display in a full-screen view.
|
 |
| Previous Forms Section Access | Previous Forms Section |
 |
 |
| New Forms Access | New Forms Page |
- Customized Export Content: Export options are now content-specific, providing more control over what information you share. Each content section (Floor Plans, Photos, Forms, etc) display its own export options, allowing you to create unique exports that have only the data you want. 📤 You can learn more about creating exports here.
- Enhanced Statistics Display: Now accessed from the project dashboard, the statistics have been redesigned for better readability and now include info icons to clarify values and how they’re calculated. Tap “See All…” next to the visible statistics (floor area, wall area, # floors, # rooms) to view all project statistics.
 |
 |
| Accessing the New Statistics Display | Improved Statistics Display |
Floor Plan Editor Updates
The Floor Plan Editor has some minor interface updates for a smoother user experience:
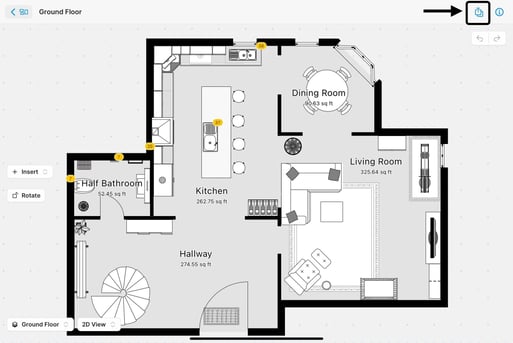
- Toolbar Adjustments: The “i” icon to add further details to a floor plan has moved to the top toolbar, and the current selection (i.e. floor name, room name, object name) is now displayed in the upper right corner of the tool bar instead of next to the “i” icon.
 |
 |
| Access to floor plan details has moved | A cleaned-up view for easy editing. |
- Details Section on Phone: If using the app on a phone, swipe up on the bottom action bar to open the details section.
 |
 |
| Swipe to access Project Details on your iPhone | iPhone Details Section View |
- Restyled UI Elements: Detail fields have been restyled for improved clarity and usability.
- Redesigned Object Menu: The object menu has been revamped, and drag & drop is now available on both tablets and phones. Favorite objects are also synced across devices.
ℹ️ Note: The AR Scan feature will no longer be available on Android devices due to technical limitations. If you require the AR scan functionality, you will need to switch to an iOS device, where this feature will continue to be supported.
Floor Plan Files and Sharing
Sharing and handling floor plan files has been updated for a more streamlined and user-friendly experience:
- Export Menu Options: Exports and integrations can be found within a floor plan by tapping the file export symbol on the top toolbar.
-
- Tap the icon next to each file type to customize it.
- The “Exports” tab now includes sharing options. Updated sharing options:
- "Share Project" is now labeled "Get Shareable Link," located under the "Exports" tab.
- "Invite Collaborators" has been removed to simplify sharing.
- "Send a Copy via Email" now only shares the floor plan, excluding other data such as photos.
- The “Integrations” tab is where you’ll find your integration export options such as XactimateⓇ and CoreLogic.
- Centralized File Access: Generated files are no longer displayed directly in “Files and Sharing” but can be accessed via a button within the project that links to the project "Files” section. This keeps all project files in one convenient location.

- PDF Editing Tools: New editing abilities make it easier than ever to customize your PDFs, streamline your workflow, and ensure every document looks exactly how you want it.
- Seamlessly fill out interactive PDF forms directly within the app.
- Annotate your PDF, including drawing, adding arrows, and more.
- Easily edit your PDF by deleting elements, modifying text, and removing pages to tailor documents to your exact needs.
 |
 |
| Access the PDF Editing Tools in any PDF file. | Use the toolbar to edit your document. |
These changes are part of our ongoing efforts to improve magicplan and offer a more streamlined, efficient experience for all users. Please review these updates carefully to understand how they may impact your workflow and reach out to our Support Team if you have any questions.